Tuesday, January 18, 2022

Top 5 Two-Factor Authentication Products by Protectimus

Protectimus is one of the biggest and most reliable two-factor authentication providers. We’ve been developing cutting-edge 2FA solutions since 2014. Being a coordination member of the OATH Initiative for Open Authentication, Protectimus is one of the strongest voices in the propagation of ubiquitous strong authentication.

The main problem Protectimus works on is perfecting multi-factor auth solutions, to make 2FA easier, cheaper, and safer for everyone. All the products we will list below fulfill at least one of those goals.

Protectimus Winlogon

This is one of the best 2-factor authentication solutions for Windows user accounts and remote desktops currently on the market. The Protectimus Winlogon 2FA solution provides access protection for computers running Windows 7, 8, 8.1, and 10. It will also protect local or remote access to a terminal Windows Server 2012/2016 over RDP.

Two-factor authentication for Windows Protectimus Winlogon

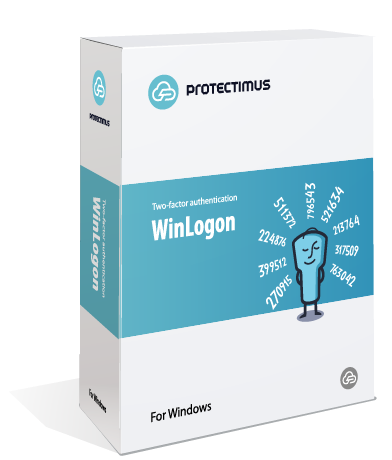
The most brilliant feature of Protectimus Winlogon is that it works even if the computer is not connected to the Internet. This is achieved with the help of backup codes. Normally, the Protectimus Winlogon component communicates with the Protectimus two-factor authentication server to validate one-time passwords. A network connection is required for that. So if the user is unable to connect to the Internet, they can’t log in to their account. But with the backup feature, the user can generate and save a backup code when installing the component. And then use that code instead of a one-time password to log into the account in offline mode.

There are, of course, other features worth mentioning:

  • Auto registration of users and tokens;
  • Mass installation on several computers ;
  • Better RDP access (2FA can be switched off for Windows with one-time password asked for RDP only; one- or two-factor auth can be set up for RDP);
  • RDP access filtering with IP and IP access control;
  • Different access policies for RDP and Winlogon;
  • PIN support in Windows 10;
  • Microsoft account support.

Protectimus Winlogon setup does not require any special knowledge and can be done in about 15 minutes. The solution is perfect both for corporate and personal use.

| Read more: Two-factor authentication for Windows 7, 8, 10, 11

Protectimus Slim NFC and Protectimus Flex

These are the first programmable tokens on the market. These hardware tokens are available in card form (Protectimus Slim NFC) and key fob form (Protectimus Flex).

Designed as a safer alternative for MFA applications, these devices can be used to protect almost any account. From Google and Office 365 to Azure MFA and 2FA Protectimus system itself.

Protectimus Flex - programmable two-factor authentication token

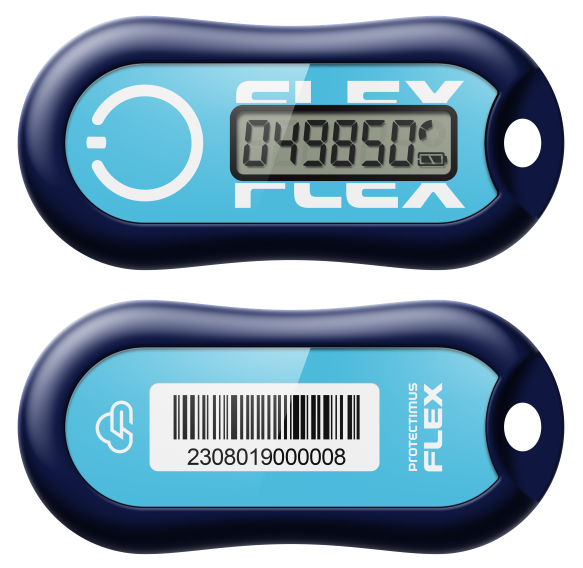
Programmable hardware tokens, unlike the classic ones, can have the seed programmed into the token by the end-user via NFC. These tokens work just like a multifactor authentication app. But the devices can be used to protect one account at a time. And they can be reused, namely, disconnected from one account and connected to another.

As we’ve already mentioned, programmable hardware tokens are a much safer alternative to the MFA apps. The one-time passwords for MFA are generated not on the users’ smartphones, but on the tokens. And the tokens have no internet connection, they can not be infected by any viruses. Intercepting such a password is virtually impossible. 

Both Protectimus Slim NFC and Protectimus Flex come with the time synchronisation feature. This allows us to avoid the time drift problem, the common issue with all TOTP hardware tokens.

The only drawback of these tokens is that the app for programming them is available for Android only. 

| Read more: New Programmable TOTP token Protectimus Flex
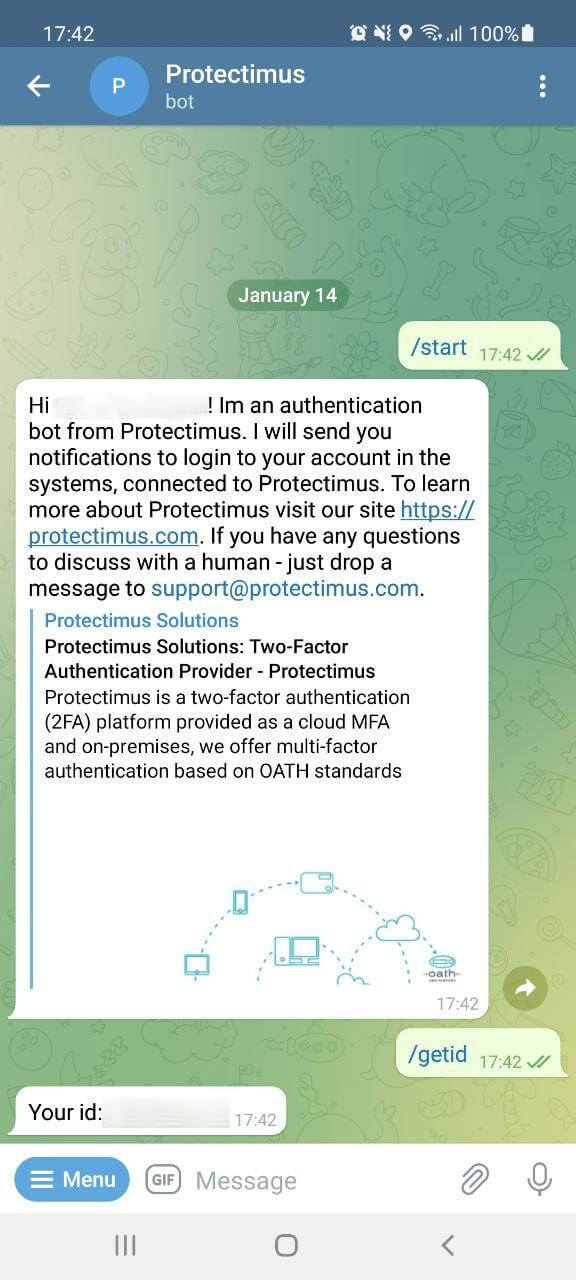
Protectimus Bot

This one is a unique Protectimus solution for delivering one-time passwords. The idea behind it is to make 2FA as easy and comfortable for the end-user as SMS authentication. Yet, without the main pitfalls of SMS authentication – high price and insecurity. So the Protectimus team came up with the idea to deliver one-time passes via the most popular messengers – Telegram, Facebook Messenger, Viber. For Protectimus clients and their end-users, this delivery method is completely free of charge. 

Protectimus Bot 2FA is much safer than SMS 2FA because the passwords aren’t delivered via the cellular networks, so the GSM network vulnerabilities can not be used to intercept the OTPs. Messages sent via these services are encrypted. So even if the OTP is intercepted the hacker won’t be able to use it. And there are no known viruses able to extract one-time passwords from the messaging apps. While SMS extraction viruses are aplenty.

Protectimus Bot in Telegram

Other things that work for the security of 2FA via the chatbot:

  1. The access to the messengers is password protected. Two-factor authentication can be used to protect them additionally.
  2. If someone attempts to log in to the user’s account, the user will immediately receive a notification. 

The end-users don’t need to install any additional apps or buy hardware tokens. There’s a 99% chance that the users already have one of these messaging apps installed. Protectimus bot can even be used without access to a smartphone since all of the chosen messengers have web versions. 

Protectimus 2FA chatbot can also deliver other messages and notifications as well as one-time passwords.

| Read more: 2FA Chatbots vs. SMS Authentication

Protectimus DSPA

This is another unique Protectimus solution. Dynamic Strong Password Authentication or DSPA for short integrates directly with a database or user directory and turns the common user passwords into dynamic ones. These dynamic passwords consist of two parts. The first part, the password the user created, is a static part. The second part is dynamic. It is an OTP and it changes every 30 seconds. The dynamic password looks something like this: Password86542

Where the “Password” part is the user’s static password, and the “86542” part is the dynamic one-time password. 

Protectimus Dynamic Strong Password Authentication Scheme

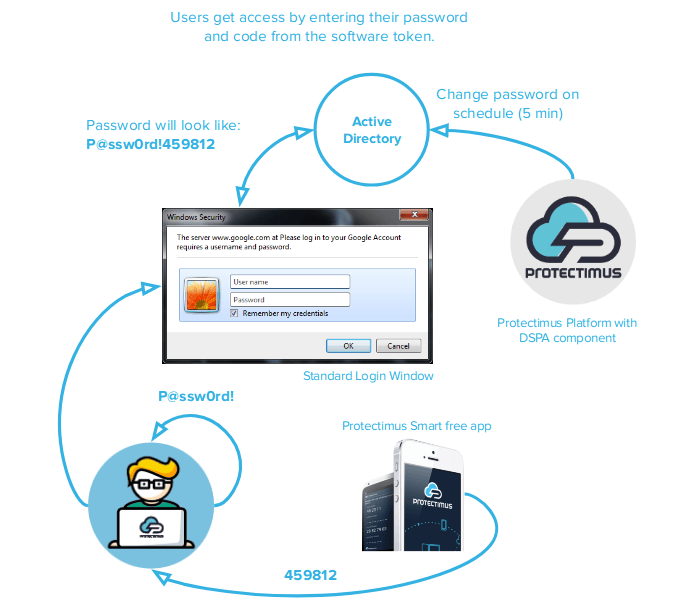
DSPA ensures that the integration is extremely easy. All the users in the database are simultaneously protected, there’s no need to configure 2FA on each endpoint.

And it offers better security. There’s no way to bypass 2FA with DSPA even if someone tries to initiate a direct request to the repository via the command line.

| Read more: Active Directory Two-Factor Authentication

Protectimus CWYS

Confirm What You See (CWYS) data signing feature from Protectimus is based on the transaction data signing method. The original method allows a user to confirm a financial operation by verifying certain details of the transaction. Usually, the recipient’s account, amount, and currency are the things verified.

Protectimus Confirm What You See function

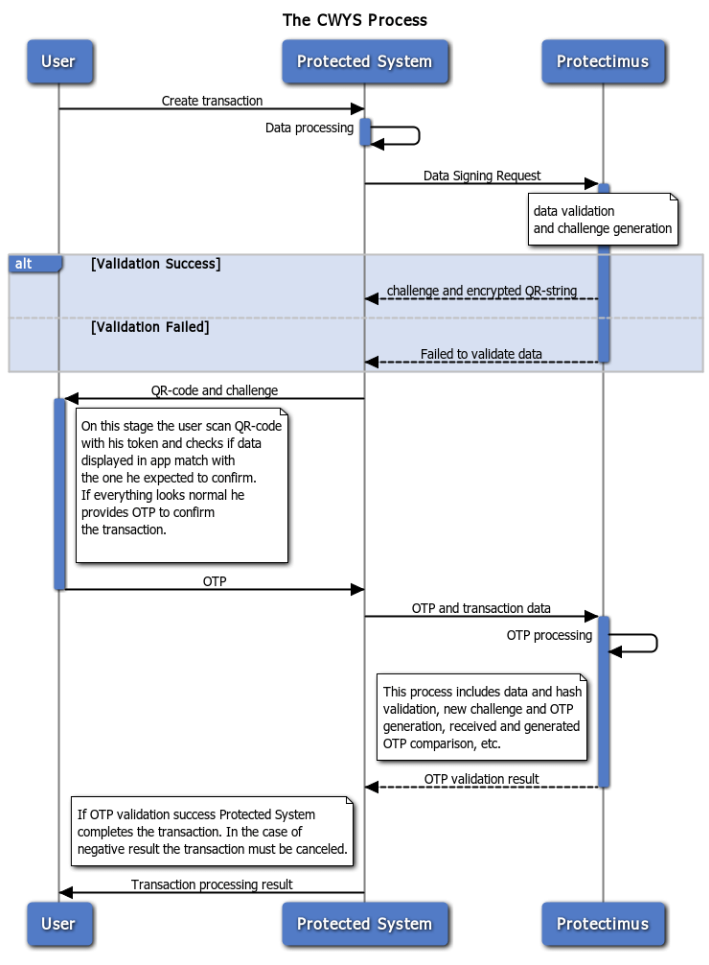
Protectimus CWYS creates one-time passwords using the user’s transaction (or another operation) data. This method is second to none in protecting financial operations. Imagine – an end-user wants to transfer a big sum. The user creates a transaction and needs to confirm it with a one-time password. This one-time password is created on the basis of this very transaction data: the transaction sum, currency, account data, etc. Thus, this OTP password can confirm only the valid transaction created by the user.

Read also

Tuesday, September 21, 2021

Adaptive Authentication or How to Make 2FA Convenient for Users

Any of us is interested in protecting confidential data from becoming the public domain on the web. Especially from people who are looking for such information for fraudulent purposes.

The effective methods to avoid the invasion of online privacy are already known. And one of the most accessible ways is protecting access to your accounts with two-factor authentication. But… unfortunately, people don’t always use this option if it’s not mandatory. Just because two-factor authentication is not convenient.

Adaptive authentication (or Intelligent Identification as we call it in Protectimus) is a way to organize two-factor authentication so that it becomes convenient for end-users. Adaptive authentication means analyzing behavioral factors typical for the user and asking for a one-time password only if a large number of mismatches is detected.

Why nobody likes two-factor authentication

Let’s imagine that every time you want to check what’s new on your Facebook account protected with 2FA, you have to go through a complete account login procedure:

  1. Enter your login and password.
  2. Then wait for an SMS with a one-time password or use your token to generates it.
  3. Then, you also need to enter this one-time password into the login form.

How much time will this procedure take? And all this is just to browse the news and messages from friends?

According to the NordPass research, an average Internet user has around 80 accounts protected with passwords. Of course, people are not ready to follow the procedure described above every time they want to enter their accounts on every website they use. Especially if we talk about the services used many times a day, like social networks or email. That is why users always choose between simplicity and security and often not in favor of the latter.

To make the authentication process more user-friendly, adaptive authentication has been invented – an authentication based on behavioral factors analysis.

| READ ALSO: SMS Authentication: All Pros and Cons Explained

What is adaptive authentication

The system of adaptive authentication keeps a record of certain parameters of the device a person uses to access their account. If the analysis of the behavioral factors shows the typical behavior of the user, the login is automatic. And if one or more of them violate the usual ‘course of events, the request for additional confirmation of the user’s identity is needed. In the case of two-factor authentication, it is required to enter a one-time password.

For example, let’s recall what happens when you log into your Gmail account. If you use the same device and the same browser, you don’t need to enter your credentials every time you check the mail. But when you try to log in to Gmail from another computer or another browser on the same device, the system will necessarily require entering your password. Sometimes you will also need to answer a secret question or use your OTP token if two-factor authentication is enabled. Google will even send a message about a suspicious sign-in attempt

Google "new device signed in to" alert

The basis of adaptive authentication consists of behavioral characteristics relatively constant for each user. Among the parameters monitored by the system can be the following:

  • name and version of the browser;
  • the list of installed plug-ins;
  • IP address, location of the computer;
  • the input language;
  • typical session time, a list of opened tabs and other behavioral characteristics of a user, etc.

It’s possible to adjust the adaptive authentication technology to the needs of each company. The authentication system can take into account more or fewer parameters during the analysis. It depends on the needs and the type of services the company provides. Every business decides which parameters to monitor and whether it needs adaptive authentication at all.

| READ ALSO: Securing VPN with Two-Factor Authentication

How Protectimus’ adaptive authentication feature works

Protectimus 2FA service allows the administrator to set custom adaptive authnetication conditions under which the authentication system will require a one-time password. We call this feature Intelligent Identification.

The list of tracked behavioral characteristics includes not only the model and version of the browser but also many other factors such as:

  • browser name;
  • browser version;
  • operating system;
  • language;
  • window dimension;
  • screen dimension;
  • color depth;
  • Java enabled or not;
  • installed plugins.

The Protectimus administrator can set the level of trust (minimal, normal, or trusted) for each of these parameters.

To enable the Protectimus Intelligent Identification feature, you should: Log in to the Protectimus cloud service or on-premise platform -> Go to Resources -> Click the Resource name -> Go to the Intelligent Identification tab -> Set up the level of trust for all available parameters -> And click Save.

How to set up Protectimus adaptive authentication feature

It is up to the customer to choose which of these factors should be taken into account. Or maybe the adaptive authentication shouldn’t be used at all.

It seems reasonable since each company that uses two-step verification has its own security requirements. For example, for social networks, forums, game platforms, it makes sense to use adaptive authentication, track behavioral factors, and request a one-time password only in case of deviation from the usual pattern of the user’s behavior. However, for banks and other companies involved in operations with money, such “loyalty” is hardly acceptable. It will be better to request one-time passwords during each login and transaction.

Adaptive authentication feature helps to make 2-factor authentication flexible and convenient both for the company and its users. We recommend you pay attention to this feature and activate it in your Protectimus account to make your users happier. Please, contact us with any questions about Protectimus two-factor authentication service and the adaptive authentication feature at support@protectimus.com.

Read more

Friday, July 9, 2021

How to Enable Protectimus Self-Service Portal

The Protectimus two-factor authentication service and on-premise platform offer a self-service feature that allows users to independently perform a number of actions related to issuing and managing their OTP tokens and their own data. The system administrator determines which actions are available to users. The list of possible actions includes:

  • registration of new tokens;
  • registration of existing tokens;
  • re-assigning the tokens;
  • unassigning the tokens;
  • tokens synchronization;
  • PIN setup;
  • removing PIN;
  • creating passwords;
  • changing passwords;
  • changing email addresses;
  • changing contact phone numbers;
  • changing logins;
  • changing first names and last names;
  • managing user environment.

In this article, we’ll show you how to enable the Protectimus Self-Service Portal. No matter which type of authentication server you choose – the Protectimus SAAS Service or the Protectimus On-premise Two-Factor Authentication Platform, the process of enabling the self-service portal is the same.

| Read also: On-Premise 2FA vs Cloud-Based Authentication

Important to Know Before Enabling the MFA Self-Service Portal

The self-service portal must be enabled and configured separately for each resource. Users must be assigned to an appropriate resource in order to have access to the self-service portal. Users must additionally have a password in Protectimus system or an email address on record. A verification code will be sent to the registered email address to allow users to log into the portal. If a user has both a password and a registered email address, that user will use the password to log in. After a token is issued for a user and assigned to a resource, the user will also be asked to input a password from the token when logging in.

You can specify a password, email address, and other information when creating a user. You can also edit existing user records. To edit a user’s information, find them in the list of users and click the user’s login. After doing so, you’ll be taken to the page for viewing user’s detailed information. Next, navigate to the Actions tab and click the Edit button. Make any necessary changes and save them.

Some add-on components, such as Protectimus RProxy, can automatically create users that are preconfigured to use the self-service portal. For example, this occurs when RProxy is set up for Citrix NetScaler Gateway.

Enabling the Protectimus Self-Service Feature

  1. Navigate to the Self-Service tab

    To enable the self-service feature, open the resource detailed information page by clicking its name in the resource list. Then, navigate to the Self-Service tab.

    How to enable Protectimus User's Self Service - step 1

  2. Specify the address at which users will access the portal

    When you click the link labeled “Enable User’s Self-Service for This Resource,” a window will appear where you can specify the address at which users will access the portal, as shown below. Enter just the final portion of the address, the portal alias, in the field. The full address to the portal will be the authentication server address plus the alias you specified. For example, if you’re using the Protectimus SaaS service, and you specify “portal” as the alias, the link you give to your users will look like this: https://service.protectimus.com/selfservice/portal

    If you are running your own instance of the authentication platform on your own premises, the “service.protectimus.com” portion of the address will be replaced with the address to your platform instance. For example: https://localhost:8080/selfservice/portal

    How to enable Protectimus User's Self Service - step 2

  3. Set up the list of actions available to users in the self-service portal

    After clicking Save, you’ll see the list of actions available to your users, as shown in the image below. By default, all actions are disabled.
    The action labels speak for themselves, but we’ll take a closer look at how each one works:

    Register New Token. Allows users to create, issue, and assign themselves tokens. When you enable this action, a list of token types available to users from the portal will appear. You can enable just the types of tokens you plan to work with, so that your users aren’t confused by an endless list of options. After a user creates a token, it will be assigned to this resource as a “token with user.” From that point on, the user will be required to enter a one-time password from the token when logging into the portal.
    Existing Token Registration. Allows users to confirm that they have received a token. Helpful when using physical tokens. After receiving a set of tokens, assign them to a resource and distribute them to your users as you wish. When users receive their tokens, they can input their serial numbers on their own and confirm the tokens are in their possession with one-time passwords.
    Re-Assign Token. Allows users to exchange an existing token for a new one. After performing this action, the old token will be unavailable.
    Unassign Token. Allows users to unlink a token with a user from a resource. The user will remain associated with the token. In effect, the resource assignment is changed from “token with user” to just “user.”
    Token Synchronization. Allows users to synchronize tokens if the time or counter on the device has become desynchronized from the server (more relevant for hardware tokens using TOTP and OCRA algorithms). Used primarily with physical tokens. Protectimus Smart has a built-in synchronization feature. It’s important to note that Protectimus Smart synchronizes itself with the time on Protectimus servers. If you have your own platform, be sure to set the time on it correctly.
    PIN Setup. Allows users to add a PIN to a token. When this feature is enabled, users are required to enter a four-digit code either before or after the OTP itself, depending on their settings. For example, if a user chooses “1111” as a PIN and chooses to enter the PIN after the OTP, and the user’s token generates “123456” as a one-time password, the user must input the following combination into the OTP entry field: “1234561111”.
    Remove PIN. Allows users to turn off the PIN feature.
    Create Password. Allows users to create a Protectimus password.
    Change Password. Allows users to change their Protectimus passwords.
    Change Email Address. Allows users to change the email address registered with Protectimus.
    Change Contact Phone Number. Allows users to change their phone number registered with Protectimus.
    Change Login. Allows users to change their Protectimus usernames. Important: when integration with other services has been set up, links between systems are usually login-based. For this reason, if users change their logins on only one system, Protectimus may become unable to identify them. This may also break business logic when communicating with third-party services.
    Change First Name and Last Name. Allows users to change their first and last name registered with Protectimus.
    Manage User Environment. Experimental feature for smart user identification. When logging into the system, the degree of correspondence between the user’s current environment and the environment they typically log in from will be evaluated.

    The list of available actions in the self-service portal

  4. How the Self-Service Portal page will look like for your users

    After enabling the actions required for you, the main page of the self-service portal will look like the page in the image below. If a particular action is disabled or not available to a given user, it won’t be shown on this page. You can also change the order in which the actions are displayed on this page.

    Protectimus 2FA Self-Service Portal page

| Read also: Active Directory Two-Factor Authentication

Testing the Self-Service Feature

To better understand how the self-service feature works, we recommend that administrators create a test user, with which they can test their desired features themselves.

Let’s go over the steps involved in ensuring that the token creation service is working:

1. Enable the self-service feature. Then, enable the token creation feature (Register New Token) as described above.

Enable the Register New Token Feature in Protectimus Self-Service Portal

2. Create a user. Give the user a password and/or email address you have access to.

Create user with password or email

3. Navigate to the Resources page and assign the user you created to a resource.

Assign user to the resource

4. Navigate to the self-service portal using the address you specified when enabling it.

Protectimus Self-Service Portal url

5. Login to the Self-Service Portal using the credentials of the User you’ve just created. Input the username for the user you created. Then input the user’s password or the code sent to its email address. If you specified both a password and an email address for the user, you’ll use the password to log in. If the information you entered is correct, you’ll be taken to the page with the list of available actions.

User login to the Protectimus self-service portal

6. Now create a Protectimus Smart software token which will be automatically assigned to this user.

  • Click Register New Token;
  • In the modal window that appears, navigate to the Software Tokens tab.
  • Choose the Protectimus Smart token.
  • Give the token a name and click “Show QR Code.”
Register new token - Protectimus Smart
  • Install and open the Protectimus Smart application on your smartphone, if you haven’t already done so. From the main screen, choose Add Token, or select it from the context menu. You’ll be asked how you would like to create the token: “Scan” lets you add a token with a QR code, and “Manual” lets you input the information on your own. Choose the “Scan” method. A QR code scanner will open in the app. Point the device at the QR code. If the scan is successful, the token will be created, and an OTP will be shown in the app.
How to add new token in Protectimus Smart OTP 2FA app
  • Input the OTP in the text area and click Save. The token will be created, and you’ll see a confirmation message. If you experience difficulties creating a token, you’ll need to synchronize your device with the server. To do so, connect the device to the internet. In the application’s menu, choose “Settings,” then choose “Time Correction” and tap “Synchronize.” Once synchronization is complete, try entering the OTP again. 
Input the OTP to finish token registration

When you’ve completed all the steps successfully, the token will be created. You’ll see it in the list of tokens in Protectimus, and it will be assigned to the user that created it, as shown below.

OTP token created using Protectimus Self-Service Portal

Having done so, the user’s assignment to the resource will change from “User” to “Token with user.” You can verify this from the Resource Detailed Information Page under the Tokens with Users tab, shown below.

The user's assignment to the resource will change from "User" to" Token with user"

You can verify that the token is working from the Token Detailed Information Page under the Check OTP tab, shown below. To verify that a token is working correctly, input the OTP from it and click Check OTP. Verification results will be shown in a notification to the right.

How check OTP feature works

Testing What Happens in Case of Token Loss or Failure

If a token is lost or becomes impossible to use, users can request a token reset from the self-service system. To do so, when logging into the portal, users must enter their usernames and click “Restore access,” beneath the password and OTP entry window. Users will then see a screen like the one shown below, where they can specify that they forgot their password, forgot their email address or lost a token. 

How to recover access to Protectimus Self Service Portal

When selecting any of these options, users will be asked to verify their identity using a remaining means of authentication. For example, if the user lost a token, they will be asked to enter their password and/or email verification code, as shown below.

How to recover access to Protectimus Self Service Portal - step 2

Users may have additionally forgotten their passwords or lost access to their email. Users in such a situation can mark the corresponding check boxes. Users who mark these boxes will be asked to enter new information with which they will be able to access the system.

How to recover access to Protectimus Self Service Portal - step 3

After entering the verification codes and other requested data, a reset request for that user will be created in the system. The administrator can view it from the User Issues page, shown below. To navigate to this page, click your account name in the top-right corner of the interface. Then, choose User Issues. 

Also, note that you can enable notifications for new user issues from the notification page.

How to recover access to Protectimus Self Service Portal - Protectimus admin view

On this page, we can see that a user whose login is “test” lost their token and is unable to verify their identity using an emailed code. The token, password, and email icons in the Authenticators column are red. Authenticators the user doesn’t have are shown in gray.

After discovering such an issue, the administrator can contact the user to understand the reason for the issue and establish the user’s identity in accordance with company policies. The administrator can then approve the user’s request by clicking Verify Identity. If the request was submitted by mistake or appears fraudulent, clicking the button with the trash can icon will delete the request.

If the administrator confirms that a token was lost, the token and user will remain assigned to the resource, but the token will be disabled. (In the list of tokens, the corresponding icon will appear in the “Enabled” column.) This allows the user to log into the self-service portal without a token and issue a new one, provided that this action is permitted from the portal. If the user requested assistance with a forgotten password or change of email address, this information will be changed to the information the user specified when submitting the request.

If the user remembers the forgotten information before the request is handled, they can simply log into the portal with the old information. The request will be deleted automatically. The same holds for fraudulent data recovery attempts. When the actual user logs in, the fraudulent request will be deleted.

| Read also: Securing VPN with Two-Factor Authentication

Conclusion

The self-service feature allows you to automate a significant portion of the administrator’s work and streamline your work with your users. It’s recommended for organizations with a large number of employees, as well as for organizations with employees in disparate geographic areas.

If you have any additional questions, contact Protectimus customer service at support@protectimus.com

Read more

Monday, April 12, 2021

Preparing your Business for Multifactor Authentication

MFA is usually viewed as a sensible thing to have, and indeed, sometimes your partners or regulators can request setting multifactor authentication up before you can start operating at full capacity. Well, let’s dive into the main specifics of it! 

So, you are weighing all pros and cons regarding the implementation of MFA authentication in your business. And naturally, you are leaning towards making the best use of it. Setting multi-factor authentication up can be a daunting task, and we’re here to cover all you’d ever need to know about it:

What Is MFA and How It Improves Your Business Security 

Let us first define what is multifactor authentication in general terms, and how it can help you to protect your business. MFA adds additional protection layers to any authentication attempt your employees and users will make to assign to their accounts. Multifactor authentication is a combination of two or more different authentication factors that your trusted users would use to access their accounts:

  • Knowledge-based, aka passwords and secret questions. Most of the data on the Internet is protected by passwords and choosing a good password can be a challenging task in itself. Learn how to choose a strong password that is easy to remember here
  • Inherence-based, aka biometrics. This one can include fingerprints, voice recognition, and other biometric data.
  • Possession-based, aka additional stuff that you (and only you) might have. It’s usually a small device that generates one-time passwords – OTP token, a phone, or, for example, a banking card.
Multifactor authentication factors

Also, some additional authentication factors can be used over and above the classic three:

  • Location-based, aka IP verification or geographic filters. It tries to utilize the information regarding the proximity of a device and/or its user regarding other devices that are usually used in the authentication. One particular example here would be checking the network the authentication attempt comes from and comparing its parameters to some trusted value.
  • Action-based, aka adding a requirement for a user to participate in some sort of distinct activity. For example, filling out a CAPTCHA.

As you see, multifactor authentication can be a very versatile tool, and it depends on the needs of your particular business which authentication methods to choose. Your chosen MFA solution and types of authenticators will depend on the needs of your particular business which are some very particular things, such as the number of your employees; their degree of personal compliance and responsibility; the laws of the country that your office is stationed in; the sensitivity of the data you utilize; the type of service you provide for your clients, and the possibility of THEM losing any of their data when interacting with your business; any sort of certifications that your line of work might demand (such as PCI DDS for finances or HIPPA if you work in healthcare). So, before setting up any solution you must have this information prepared and organized.

And there is always an important thing to keep in mind: MFA can protect your data from malicious actors, but it won’t protect it against destructive negligence. As it asks from its users for more involvement, they tend to do ever less. You must efficiently balance asking and delivering: your chosen solution must be secure enough to do its job, and unobtrusive enough to keep its users from trying to circumvent it.

| Read also: 6 MFA Myths You Still Believe

Use Multifactor Authentication to Protect the Most Important Accounts First

We’ve established that MFA security is a fairly complex venture that asks for your time and money, and also can inconvenience your employees.

So, can you cut corners here? As it turns out, you can. 

Your MFA will cover different groups of people within (and outside) your company. While your local laws and business standards may require you to commit to full MFA coverage, an easier and more practical solution would be to pick out some priority groups first.

  • The highest priority would be your employees who handle the most sensitive data. Most of the cases that would be CEO, CTO, any other higher-ups, and your network administrators. 
  • Your end users also should be protected if they trust you with any personal data at all. 
  • Another group would be your regular employees, who may have almost zero access to confidential data.
Protect the most important accounts with MFA first

As a rule of thumb (and also according to NIST (The US National Institute of Standards and Technology) guidelines) MFA should be used whenever possible. But if you are on a tight budget, you might want to test your solution on a smaller group of people first. Showing your colleagues, partners, and clients that you have two-factor authentication will usually work as a sign of good faith — for starters. This is especially important for any healthcare or financial institution, more so if there were any data breaches recently. Prioritize your administration when you are starting to organize the inner workings of your business, and switch the focus to your end-users whenever you start going public.

| Read also: Best Protectimus MFA Features for Financial Services Cybersecurity

Choose Most Practical MFA Solutions

Your chosen 2-factor authentication service must be versatile enough to support multiple authentication methods so you can switch and adapt to any given situation on the fly. It also must be convenient and easy both in implementation inside your given workspace, and in usage by your team. Consider if your MFA options do more good than harm to your regular employee — securing that database is, of course, paramount, but do you really need to ask the one-time password each time the session expires? 

Then again, things cost money. It can be impractical and quite expensive to give a hard token to each and every one of your employees. Perhaps some of them will be better off with a free OTP delivery via chat-bots in messaging apps or 2FA apps, especially if they utilize their own devices at work. And those who don’t agree to use their own devices as 2FA tokens, can get programmable hardware OTP tokens like Protectimus Flex or Protectimus Slim NFC. Also, you can order hardware OTP tokens for the system administrators and other employees who have the highest level of access to confidential data, as hardware tokens are the most reliable authentication method. Read more about the pros and cons of different two-factor authentication methods here.

Your ideal MFA solution should look like this:

  • easy to install and maintain;
  • compatible both with your technical requirements and software and hardware (Windows and RDP, OWA, ADFS, Azure, VPN, etc.);
  • flexible enough to accommodate your business with a variety of authentication factors;
  • user-friendly and making good use of adaptive authentication features;
  • respects the time and efforts of your network administrators;
  • being affordable and not overpriced for the amount of utility that it offers.
How to choose a multifactor authentication solution

Do your best to keep up with the latest trends in the world of cybersecurity, as it may both save you money otherwise spent on inefficient solutions, and save your data from unreliable MFA security solutions. For example, SMS codes, while still fairly standard, are vulnerable to being circumvented through identity theft, as bad actors can attempt to contact the mobile service provider pretending they are the SIM-card holders.

| Read also: On-Premise 2FA vs Cloud-Based Authentication

Remember That Multifactor Authentication Must Be as Easy for Users as Possible

One of the best ways to make your multifactor authentication as user-friendly as possible is to choose between multifactor authentication vendors who offer adaptive authentication options. Adaptive authentication will assess the risk of a breach each time a user goes through the authorization process and will act accordingly depending on a predefined set of rules that applies to the user of this particular group. 

In other words, adaptive authentication means analyzing the user’s environment (browser name and version, operating system and language, window size and screen resolution, color depth, presence or absence of Java, plugins, etc.) and asking an OTP code only if an established mismatch threshold has been exceeded.

This solution becomes more precise the longer you use it as it builds the database of safe profiles and environments for your users to compare against any future login attempt. This feature adds flexibility and lowers obtrusiveness if compared with the regular MFA solution without the adaptive authentication feature.

Find the Best 2FA Provider

All other things settled, you still need to choose the right multiple factor authentication provider to implement the solution that suits you. So, what things should you be on the lookout for?

  1. Obviously, the MFA provider must be able to work within the boundaries of the exact solution you need for your specific situation.
  2. The solution must not be too complex, as complex implementations usually earn the ire both of your IT department and your end-users.
  3. It should be affordable, stable, and work as advertised.

Your best bet is to choose something that integrates easily into your existing IT framework. Undemanding and simple solutions give you more time to actually react and mitigate the threats you’d encounter.

Being the top solution for any of your MFA necessities, Protectimus can offer any MFA technology that you might need for your business. Protectimus is also fully prepared to take on custom requests regarding MFA, and will help to integrate your chosen 2FA into your particular infrastructure, however intricate or straightforward it might be.

| Read also: Two-Factor Authentication Solutions Comparison: Google Authenticator vs. Protectimus

Explain Multifactor Authentication to Its End Users

Even the best defense falls flat if people don’t realize (or don’t care) how to use it. Take care to explain your multi-factor security system to everyone who’d use it one way or another. If it’s your employee, make a point about how the data they are working with is made into a product you are working with. Make an additional point on how losing the data equals losing the product, equals losing the profit. 

If you are using MFA with your clients, your best bet is to make it as unobtrusive as possible, and also to give away some sort of minor encouragement (for example, limited access to some premium feature) to any user who’d voluntarily apply to use it.

But the most important thing to realize is that MFA exists only to protect your business and personal or confidential data you store. Knowing without a doubt that it’s not a liability but a boon for your company will help you to make the right decision and start looking for an effective solution — today.

Read more

Wednesday, January 28, 2015